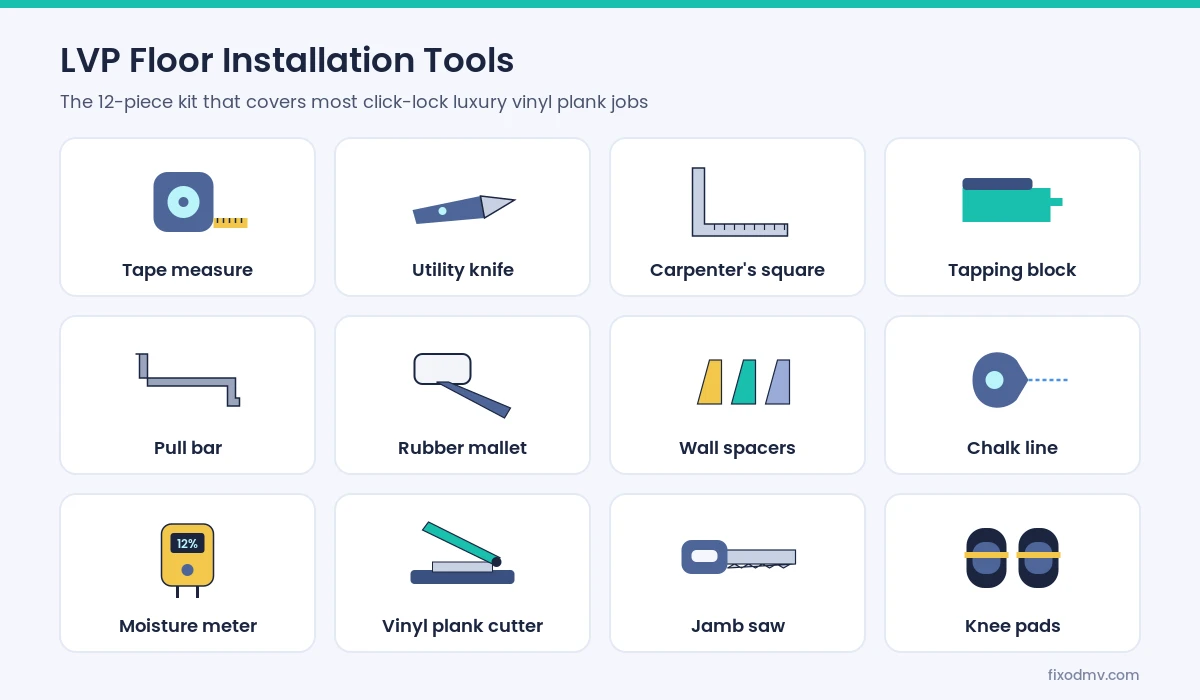
The core LVP floor installation tools are a tape measure, chalk line, square, utility knife, tapping block, pull bar, rubber mallet, wall spacers and knee pads. Add a moisture meter, a straightedge for checking flatness, and a jamb saw or oscillating tool for door casings, and you can install most click-lock luxury vinyl plank. Saws such as a miter saw make the job faster, but a sharp knife handles most straight cuts.
Luxury vinyl plank has a reputation as the easiest hard floor to install, and that’s mostly fair. The planks click together, float over the subfloor and cut with a knife. But the gap between a floor that looks professional and one that gaps, peaks or squeaks usually comes down to tools: the right ones used at the right moment, and a few wrong ones left in the truck.
This checklist covers 21 LVP floor installation tools, grouped by the stage of the job where you need them, plus what to buy, what to rent and what to skip. Alvin wrote it for FIXO, using the tool lists in manufacturer installation guides and the kit FIXO crews carry on LVP jobs across Northern Virginia, Maryland and DC.
What this tool checklist covers
Key takeaways
- A sharp utility knife and a square make most straight cuts. Score the wear layer, snap the plank, then cut any attached pad.
- A tapping block and pull bar close joints without damaging the locking edges. Never strike a plank edge directly with a hammer.
- Rigid-core floors commonly need a subfloor flat to 3/16 inch over 10 feet, so a long straightedge belongs in the kit.
- Most floating LVP needs about a 1/4-inch gap at the walls. Spacers hold it while you work.
- Rent the big LVP floor installation tools, such as a miter saw, and buy the cheap hand tools.
- Always follow your product’s own instructions. Some brands even tell installers not to use a hammer and tapping block at all.
LVP Floor Installation Tools at a Glance
The table lists all 21 LVP floor installation tools in this guide with the job each one does and whether a typical click-lock install really needs it. Must-have tools are the ones a pro would refuse to start without. Nice-to-have tools save time or improve the finish on trickier rooms.
| # | Tool | What it does | Need level |
|---|---|---|---|
| 1 | Tape measure | Room sizes, plank lengths, row widths | Must-have |
| 2 | Chalk line | Straight reference line for the first row | Must-have |
| 3 | Carpenter’s or speed square | Square cuts and straight scoring | Must-have |
| 4 | 6- to 10-foot straightedge | Finds dips and humps in the subfloor | Must-have |
| 5 | Contour gauge | Copies odd shapes such as door casings | Nice-to-have |
| 6 | Pin moisture meter | Checks wood subfloors before you start | Must-have over wood |
| 7 | Concrete moisture test | Measures slab moisture under the floor | Must-have over concrete |
| 8 | Shop vacuum | Clears grit that causes bumps and clicks | Must-have |
| 9 | Floor scraper | Removes old adhesive, paint and drywall mud | Nice-to-have |
| 10 | Trowels and patch | Fill low spots before the floor goes down | As needed |
| 11 | Utility knife | Score-and-snap cuts | Must-have |
| 12 | Vinyl plank cutter | Fast, dust-free crosscuts | Nice-to-have |
| 13 | Jigsaw | Notches, curves and vent cutouts | Nice-to-have |
| 14 | Miter saw | Clean crosscuts and trim | Nice-to-have |
| 15 | Jamb or undercut saw | Lets planks slide under door casings | Must-have |
| 16 | Oscillating multi-tool | Flush cuts in tight corners | Nice-to-have |
| 17 | Tapping block | Closes long-side joints safely | Must-have* |
| 18 | Pull bar | Closes joints against the wall | Must-have |
| 19 | Rubber mallet | Drives the block and bar without marking | Must-have |
| 20 | Wall spacers | Hold the expansion gap | Must-have |
| 21 | Knee pads | Protect knees on hard floors all day | Must-have |
*Check your flooring’s instructions. Some rigid-core lines rely on hand pressure and a pull bar and tell installers not to use a tapping block.
Measuring and Layout Tools for LVP
Among LVP floor installation tools, the layout tools decide how the finished floor looks long before the first plank clicks in. These five tools help you plan straight rows, balanced border widths and clean cuts around obstacles.
1. Tape Measure
Every set of LVP floor installation tools starts with a tape measure, and a 25-foot tape with a stiff blade covers most rooms. Measure each room in two or three places, because walls in older DMV homes are rarely parallel. Those measurements also tell you the width of the last row, which should stay at least half a plank wide so you don’t end up with a sliver against the wall.
2. Chalk Line
A chalk line is one of the cheapest LVP floor installation tools and saves the most grief, because walls aren’t straight enough to start from. Snap a chalk line parallel to the longest wall, at the width of the first row plus the expansion gap, and install the first row to the line instead of the wall. In long hallways and open plans, a second line halfway across the room is a quick way to confirm you haven’t drifted.
3. Carpenter’s or Speed Square
A square guides the knife for straight scores and checks that cuts are truly 90 degrees. A large framing square works well for wide planks, while a speed square is easier to carry in a tool belt. Metal squares hold up better than plastic ones once a blade has run along them a few hundred times.
4. Straightedge
Rigid-core LVP shows every dip in the subfloor. A 6- to 10-foot straightedge, or a long, straight level, lets you find low and high spots before they telegraph through the planks. More on the flatness standard in the prep section below.
5. Contour Gauge
Among vinyl plank flooring tools, a contour gauge is the specialist: it copies the outline of a door casing, pipe or stone hearth so you can transfer it to a plank. It isn’t essential, since you can make templates from cardboard, but it saves time in kitchens and bathrooms where every cut seems to meet something odd.
Subfloor Prep: The LVP Floor Installation Tools People Skip
Most LVP failures start below the floor. These LVP installation tools check the subfloor and get it ready, and they matter as much as anything you use to set the planks.
6. Pin Moisture Meter
Of all the LVP floor installation tools on this list, the moisture meter is the one most often skipped. Over plywood or OSB, it tells you whether the subfloor is dry enough. One rigid-core installation guide sets a 14 percent maximum moisture content for wood subfloors and asks for readings within 3 percent of any underlayment panel. Take readings in several spots, especially near exterior walls, bathrooms and the kitchen sink.
7. Concrete Moisture Test
Basements and slab homes need a slab moisture test. Manufacturer guides commonly call for in-situ relative humidity testing under ASTM F2170, with calcium chloride testing under ASTM F1869 as an alternative. Pros usually rent or own the probes. A plastic sheet taped to the slab overnight is a rough first look, not a substitute for the test your warranty may require.
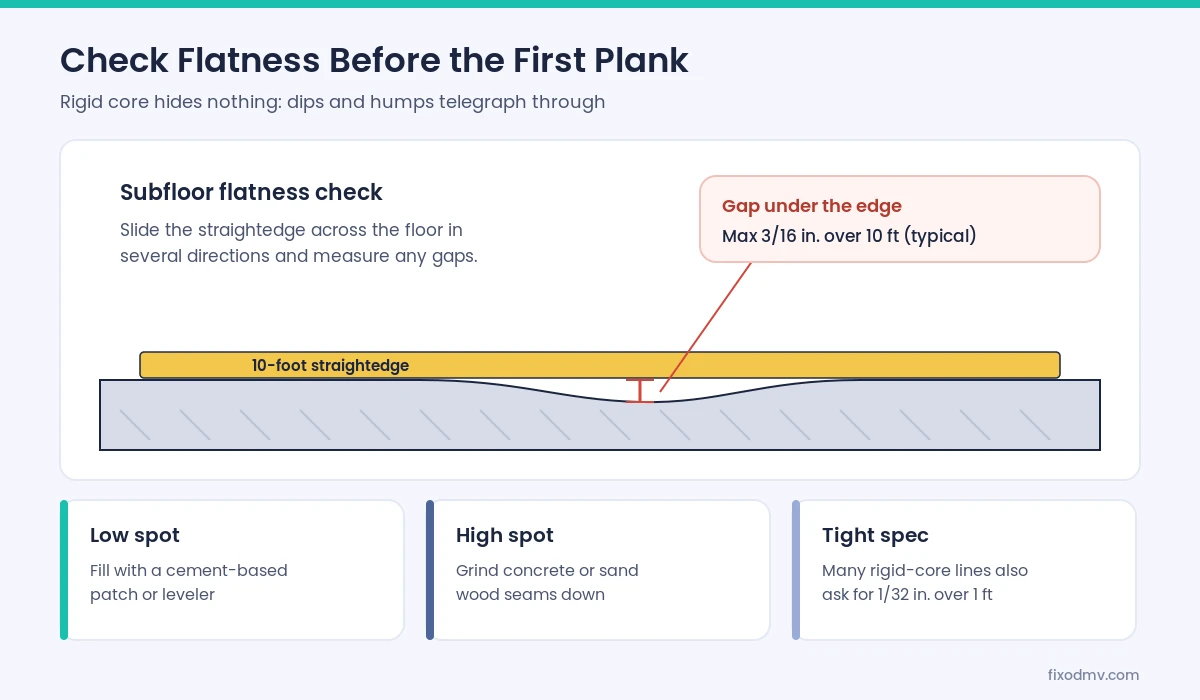
While you test, check flatness too. Many rigid-core makers allow no more than 3/16 inch of variation across 10 feet, and some products also ask for no more than 1/32 inch over 12 inches. Slide the straightedge across the room in several directions and mark any spot where you can slip a shim under it.
8. Shop Vacuum
A grain of sand under a floating floor turns into a click or a bump. Vacuum the subfloor before underlayment goes down and again before each section of planks. Like the other LVP installation tools in this section, a shop vacuum earns its place: it also pulls dust out of plank grooves, which helps the locks seat fully.
9. Floor Scraper
A long-handled scraper removes old carpet pad adhesive, drywall mud and paint drips from a slab or plywood. Those ridges look small but can stop a plank from sitting flat. A stiff-bladed scraper on a pole is far easier on the back than working on your knees with a putty knife.
10. Trowels and Patching Compound
Low spots get filled with a cement-based patch or self-leveling compound, spread with a flat or margin trowel. High spots in concrete get ground down, and high seams in wood get sanded. Use the patch your flooring maker approves, and let it cure fully before planks go over it.
Vinyl Plank Flooring Tools for Cutting
LVP cuts more easily than laminate or hardwood, which is a big reason homeowners try it themselves. These six vinyl plank flooring tools cover everything from simple crosscuts to notches around door frames.
11. Utility Knife
The utility knife is the most-used of all LVP installation tools. Home Depot’s vinyl plank installation guide notes that pros usually score the plank with a utility knife and snap it, and that method works for most straight cuts. Keep a pack of spare blades nearby, because a dull blade drags across the wear layer and leaves a ragged edge.
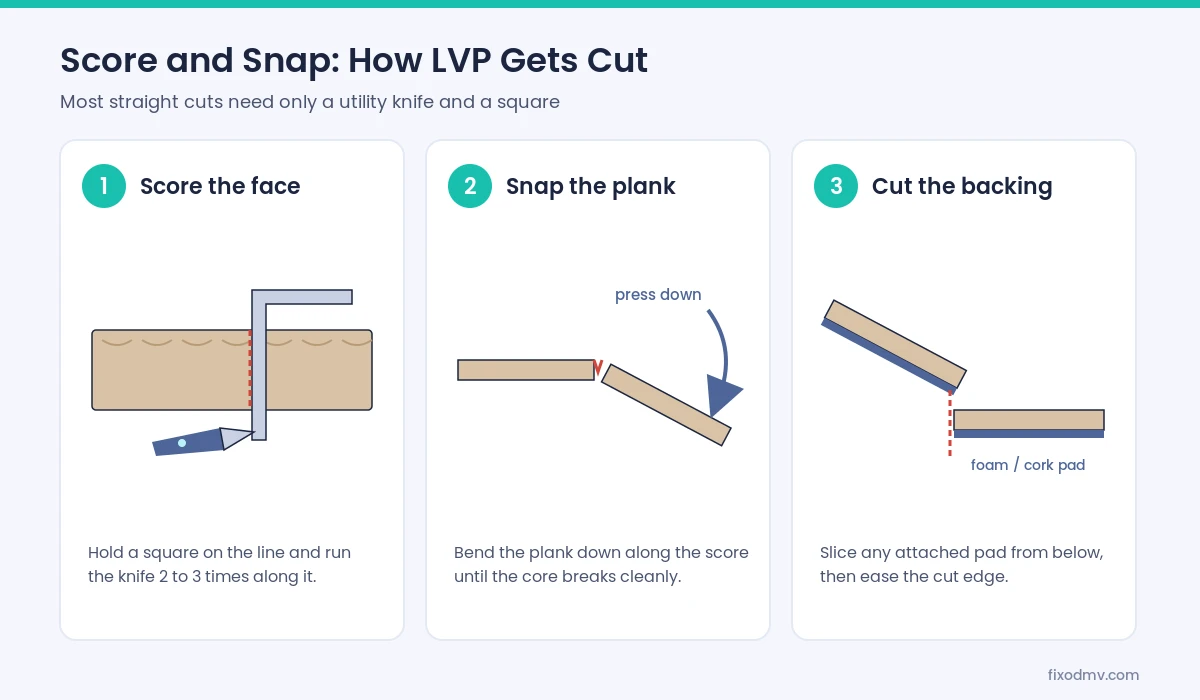
The technique is simple. Hold a square on the line, score the face two or three times, bend the plank until the core snaps, then slice through any attached foam or cork pad from underneath. The same method trims long rip cuts for the last row, though those take a few more passes.
12. Vinyl Plank Cutter
A vinyl plank cutter works like a paper guillotine: set the plank on the base, line up the mark and press the handle. It makes clean crosscuts with no dust or noise, which is handy in occupied homes and condos. It won’t do long rips or notches, so it adds to the knife rather than replacing it.
13. Jigsaw
A jigsaw rounds out the cutting side of your LVP floor installation tools. It handles curves, notches around pipes, cutouts for floor registers and the L-shaped cuts you need around door frames and stair nosings. A fine-tooth blade gives the cleanest edge. Cut with the decorative face down if the blade cuts on the upstroke, to keep chipping on the side nobody sees.
14. Miter Saw
A miter saw makes fast, square crosscuts and cuts transition strips and quarter round. It’s the tool most homeowners rent or borrow rather than buy for one floor. Use a fine-tooth blade and support long planks on both sides so they don’t snap before the cut is done.
15. Jamb or Undercut Saw
Door casings should be undercut so the planks slide underneath, rather than scribing the floor around the trim. Lay a plank and underlayment scrap on the floor as a height guide, then run a jamb saw along it. Hand jamb saws are inexpensive, and powered ones are among the LVP installation tools most worth renting. Powered undercut saws are faster on whole-house jobs and worth renting.
16. Oscillating Multi-Tool
An oscillating tool makes flush cuts where no other saw fits: under a stubborn casing, along a toe kick or around a stair stringer. It also cuts out a damaged plank in the middle of a finished floor, which makes it one of the more useful tools after installation too.
LVP Installation Tools for Setting Planks
These four LVP installation tools do the actual assembly. Used well, they close joints tightly without damaging the locking edges that hold a floating floor together.
17. Tapping Block
A tapping block fits against the long edge of a plank so a light tap with a mallet closes a stubborn joint. The block spreads the force across the locking profile instead of crushing it. Use the block made for your plank’s profile where possible, and tap gently. Some rigid-core products, as the TileBar rigid core installation guide shows, tell installers not to use a hammer and tapping block at all.
18. Pull Bar
Against a wall there’s no room for a tapping block, so a pull bar hooks over the far end of the plank and pulls it into the joint as you tap the bar’s other end. You need it on every last row and on the short ends of planks next to walls, and no other LVP installation tools work as well at the wall. A flat steel bar with a padded hook is less likely to mark the face.
19. Rubber Mallet
A white or non-marking rubber mallet is one of the LVP floor installation tools that touches every row. It drives the tapping block and pull bar without bouncing hard enough to damage locks. Black rubber mallets can leave scuffs on light floors. A dead-blow mallet works well too, since it delivers force without rebounding.
20. Wall Spacers
Spacers are the cheapest of all LVP floor installation tools. A floating floor grows and shrinks as the temperature changes, so it needs a gap at every wall and fixed object. Spacers hold that gap while you install and keep the first row from shifting as you push rows together.
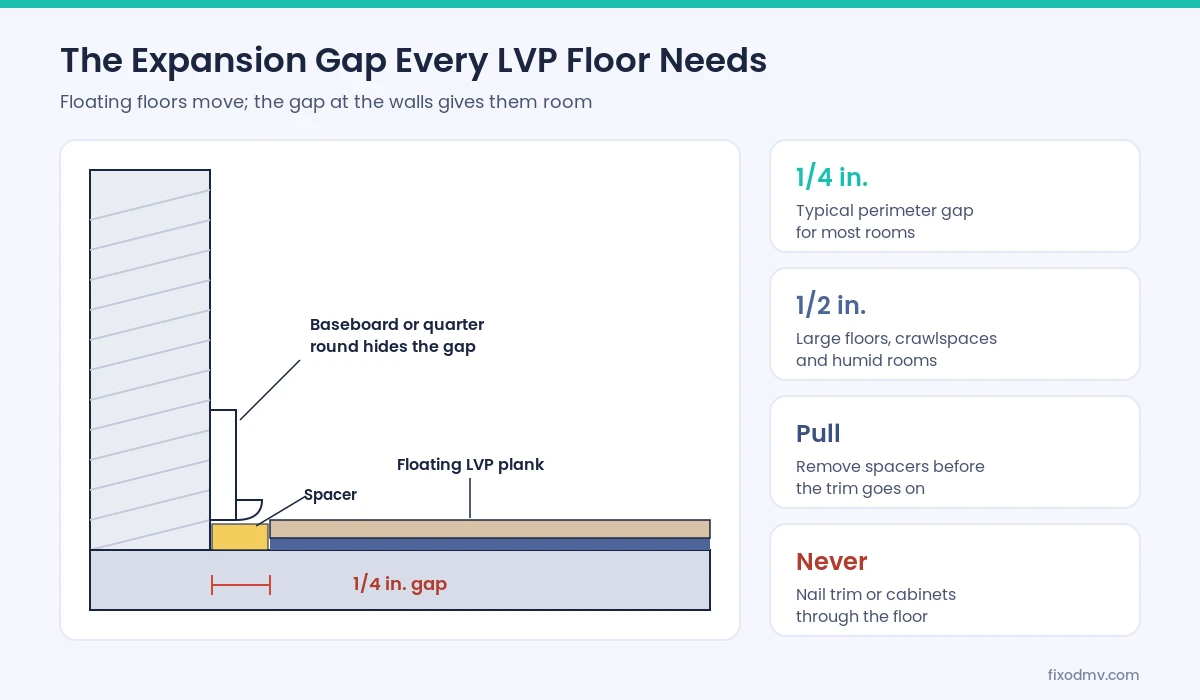
A 1/4-inch perimeter gap is typical for most rooms, and the TileBar guide calls for 1/2 inch on floors over 2,500 square feet or over moisture-prone wood subfloors. Pull the spacers out before trim goes back on, and never pin quarter round or baseboard down through the planks.
Comfort and Safety Gear
Comfort gear is the most overlooked part of any set of LVP floor installation tools. It sounds optional until you’ve spent a full day on a hard floor. It also keeps you working carefully, which shows in the finished floor.
21. Knee Pads
Good knee pads with a hard shell and thick foam are the one tool every installer names first. Add safety glasses for sawing and scoring, cut-resistant gloves for handling sharp plank edges, and a dust mask when cutting with power saws. Home Depot’s guide recommends goggles and work gloves during installation as well.
Buy, Rent or Skip: Spending on LVP Floor Installation Tools
You don’t need a truck full of LVP floor installation tools for one room. Spend on the inexpensive hand tools you’ll use every few minutes, rent the big saws and testing gear, and skip the tools that belong to other flooring types.
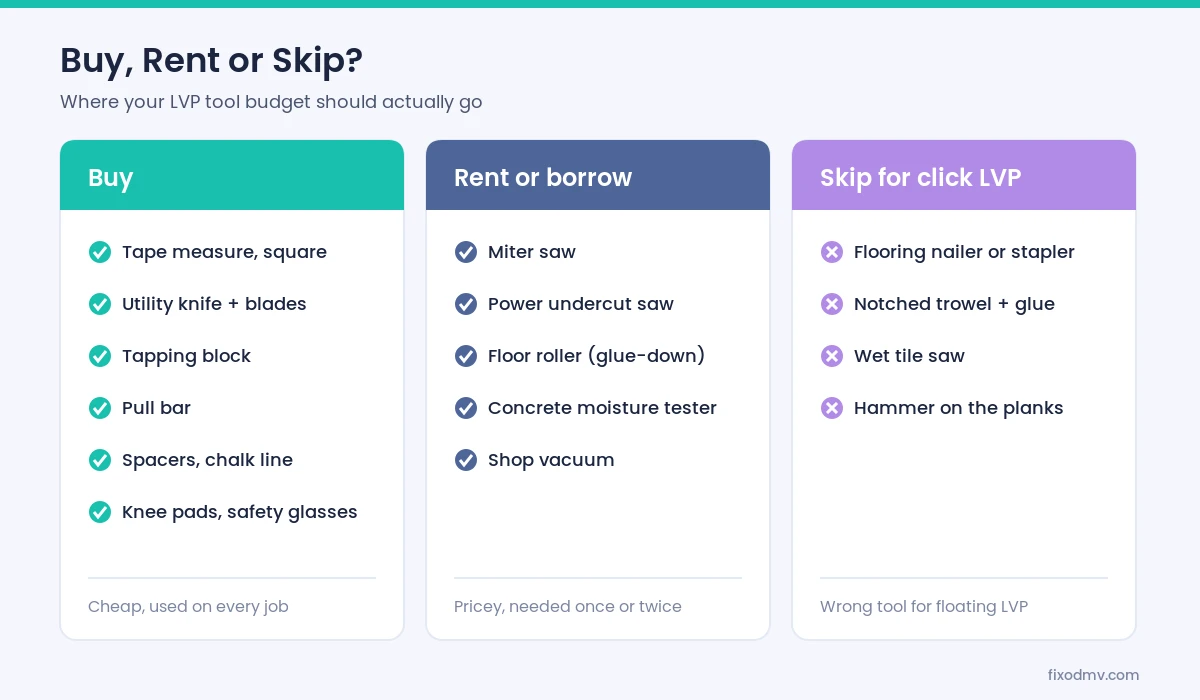
- Buy: tape measure, square, utility knife and blades, tapping block, pull bar, spacers, chalk line, knee pads and safety glasses. These are cheap and you’ll use them constantly.
- Rent or borrow: miter saw, powered undercut saw, concrete moisture probes and a heavy floor roller if you’re gluing down. You’ll use them for a day or two.
- Skip for click LVP: flooring nailers and staplers, notched trowels and adhesive, wet tile saws, and any hammer that touches a plank directly.
If you’re installing a whole house, the math shifts. Two vinyl plank flooring tools, a plank cutter and a powered undercut saw, save enough hours on a large job to justify owning them.
Extra Tools for Glue-Down LVP
Glue-down or dryback LVP is common in commercial spaces and some condos, because it feels solid and handles heavy rolling loads. It needs a few vinyl plank flooring tools that click-lock floors don’t:
- Notched trowel: sized to the adhesive maker’s spec, so the right amount of glue goes down.
- Approved adhesive: pressure-sensitive or wet-set, matched to the flooring and the subfloor.
- Hand roller: presses planks into the adhesive along walls and in tight spots.
- Floor roller: a heavy roller, often 75 to 100 pounds, that sets the whole floor into the adhesive.
Glue-down jobs leave less room for error, because a plank set in the wrong spot is hard to move once the adhesive grabs. They also need a flatter, cleaner subfloor than most floating floors.
How the Tools Come Together on Install Day
On a typical click-lock job, the LVP floor installation tools come out roughly in this order:
- Test and prep. Moisture meter or slab test, straightedge, scraper, patch and shop vacuum.
- Lay out. Tape measure and chalk line set the first row, with spacers along the starting wall.
- Undercut. The jamb saw trims every door casing before planks reach them.
- Install. Knife, square, tapping block and mallet move the floor across the room, row by row, with end joints staggered.
- Finish. Pull bar on the last row, jigsaw or oscillating tool for notches, then spacers out and trim on.
Acclimation fits in before step one. Some rigid-core floors don’t need it when stored in normal conditions, while others ask for 48 hours in the room. Check the box or the installation sheet.
Tool Mistakes That Ruin LVP Floors
The wrong tool, or the right tool used badly, causes most of the problems FIXO sees when called to fix a DIY floor:
- Hammering planks directly. It crushes the locking edge, and the joint never closes tightly again.
- Dull blades. A dull knife tears the wear layer and leaves fuzzy edges that show at every butt joint.
- Skipping the straightedge. Dips under rigid core cause bounce, clicking and joints that open over time.
- No spacers. Planks tight to the wall buckle or peak when summer humidity arrives.
- Scribing instead of undercutting. Cutting the floor around casings leaves gaps that caulk never hides well.
- Nailing trim through the floor. It pins a floating floor in place and stops it from moving.
Most of these come from using LVP installation tools the wrong way, not from bad planks. Our guide to what LVP flooring is explains why rigid and flexible cores react differently to these mistakes.
LVP Installation Tools FAQs
What tools do I need to install LVP flooring?
The essential LVP floor installation tools for click-lock LVP are a tape measure, chalk line, square, utility knife, tapping block, pull bar, rubber mallet, wall spacers and knee pads. Add a moisture meter or slab test, a straightedge and a jamb saw for prep and door casings. A jigsaw and miter saw help with notches and fast crosscuts.
Can I cut LVP with just a utility knife?
Yes, for most straight cuts. Score the face two or three times along a square, snap the plank, then cut any attached pad from underneath. You’ll still want a jigsaw or oscillating tool for notches, curves and cutouts around vents and pipes.
Do I need a tapping block for vinyl plank flooring?
Most click-lock products use one to close stubborn long-side joints without damaging the edge. Some rigid-core brands tell installers not to use a hammer and tapping block and to rely on hand pressure and a pull bar instead. Follow the instructions for your specific floor.
What size expansion gap does LVP need?
About 1/4 inch at walls and fixed objects is typical for most rooms. Some manufacturers ask for 1/2 inch on large floors, often over 2,500 square feet, or over wood subfloors in humid spaces. Baseboard or quarter round covers the gap.
Do I need a saw to install LVP?
Not strictly. A utility knife, a jamb saw for door casings and a jigsaw for notches cover most rooms. A miter saw or vinyl plank cutter speeds up crosscuts on larger jobs, and many homeowners rent the bigger vinyl plank flooring tools rather than buy them.
Should I check subfloor moisture before installing LVP?
Yes. Over wood, use a pin meter. One rigid-core guide sets a 14 percent maximum. Over concrete, use the slab test your flooring maker specifies, often ASTM F2170 relative humidity testing. Skipping it is a common reason warranty claims get denied.
Planning Your LVP Install
The right LVP floor installation tools make a straightforward floor go in cleanly, but they can’t fix a wet slab or a wavy subfloor. Test and flatten first, keep blades sharp, protect the locking edges and leave the expansion gap, and the floor will hold up for years.
If you’d rather not buy or rent the kit, FIXO crews lay luxury vinyl plank in homes throughout the DMV, priced as one fixed number up front. See our LVP flooring installation page for what’s included, check our LVP installation cost guide, or use the instant quote form.
 4.9 on Google14 reviews
 Licensed & InsuredVirginia · Maryland · Washington, D.C.
 Workmanship GuaranteedInstallation backed in writing
 Locally OwnedServing NoVA, MD & D.C.